Wednesday, September 18, 2013
Working with mouse keys
Mouse Keys enables the user to use the numeric keypad to move the pointer instead of by using the mouse. This will benefit users who are unable to use or have difficulty using the mouse or other equivalent pointing device.
Turning On Mouse Keys
Mouse Keys may be turned on via either of the two following ways:
VIA THE CONTROL PANEL
- Open the Ease of Access control panel, and click on Change how your keyboard works.
- Check the box labeled Turn on Mouse Keys, and click OK (Figure 1).
- Make sure NUMLOCK is on. (By default Mouse Keys will not be used if NUMLOCK is off.)

Figure 1. Ease of Access keyboard options. Check the circled box to enable Mouse Keys.
BY PRESSING THE ALT, LEFT SHIFT, AND NUM LOCK KEYS SIMULTANEOUSLY
Without pressing other keys, press the ALT, left SHIFT, and NUM LOCK keys simultaneously. A window will be displayed asking you if you wish to turn on Mouse Keys (Figure 2). Clicking Yes will enable Mouse Keys.

Figure 2. Turn on Mouse Keys dialog box.
How To Know That Mouse Keys is Working
By default, the Mouse Keys icon will display on the task bar (Figure 3). By default, Mouse Keys will not be used if the NUM LOCK is off. While in use, the Mouse Keys icon will be like the one highlighted in Figure 4. If you do not see the icon or hear a sound when pressing a modifier key, make sure the Feedback options are checked in the Mouse Keys options dialog (Refer to Mouse Keys Options).

Figure 3. Mouse Keys icon, showing mouse keys not in use.

Figure 4. Mouse Keys icon, showing mouse keys in use.
Mouse Keys Options
You may configure Mouse Keys options by clicking on Set up Mouse Keys in the Ease of Access control panel. By default, Windows will play a sound when enabling or disabling Mouse Keys via the keyboard and when NUM LOCK is turned on or off.
WORKING WITH STICKY KEYS ON YOUR COMPUTER
Sticky Keys enables the user to enter key combinations by pressing keys in sequence rather than simultaneously. This will benefit users who are unable to press or have difficulty pressing shortcut key combinations.
Turning On Sticky Keys
Sticky Keys may be turned on via either of the two following ways:
VIA THE CONTROL PANEL
- Open the Ease of Access control panel via the instructions above and click on Change how your keyboard works.
- Check the box labeled Turn on Sticky Keys, and click OK (Figure 1).

Figure 1. Ease of Access keyboard options. Check the circled box to enable Sticky Keys.
BY PRESSING THE SHIFT KEY FIVE TIMES
Without pressing other keys, press the SHIFT key five times to enable Sticky Keys. A window will be displayed asking you if you wish to turn on Sticky Keys (Figure 2). Clicking Yes will enable Sticky Keys.

Figure 2. Turn on Sticky Keys dialog box.
How To Know That Sticky Keys is Working
By default the Sticky Keys icon will display on the task bar (Figure 3), and Windows will play a sound when a modifier key is pressed. If you do not see the icon or hear a sound when pressing a modifier key, make sure the Feedback options are checked in the Sticky Keys options dialog

Figure 3. Sticky Keys icon.
Turning Off Sticky Keys
To turn off Sticky Keys, press the shift key five times or uncheck the Turn On Sticky Keysbox in the Ease of Access control panel. If the default options are selected, pressing two keys simultaneously will also turn off Sticky Keys.
Sticky Keys Options
You may configure Sticky Keys options by clicking on Set up Sticky Keys in the Ease of Access control panel. As stated above, Sticky Keys is configured by default to play a sound when enabled or disabled via the SHIFT key or when a modifier key is pressed.
Tuesday, September 17, 2013
How ro Remove Audio From video with help of Window live movie maker
Monday, September 16, 2013
Create Separate Contact Page in Blogger
Blogger launched it’s official version of the Contact Form Widget
but, it works only on the Blogger Sidebar. If you don’t want to add the
contact form to your Blog’s sidebar but want it to appear on a specific
page, then this tutorial will help you out. I didn’t want the contact
form to appear every where on my blog. So I have moved it to a separate Contact Me Page
How to move the Blogger Contact Form to a separate Page
Follow the below steps to move the Contact Form to a separate page. If you would like to see a demo, you can check out my Contact page.- First, add the Blogger Contact Form Widget to your sidebar. (We will hide the contact form later in this tutorial, but you have to add it) . My previous tutorial on adding a blogger contact form widget will help you out.
- Now create a new page in your blog
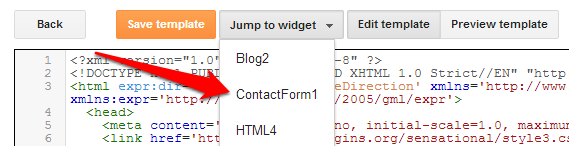
- Now go to Template > Edit HTML
and Jump to the ContactForm Code and expand with widget code

and then expand the main b:includable

Now delete the code highlighted below
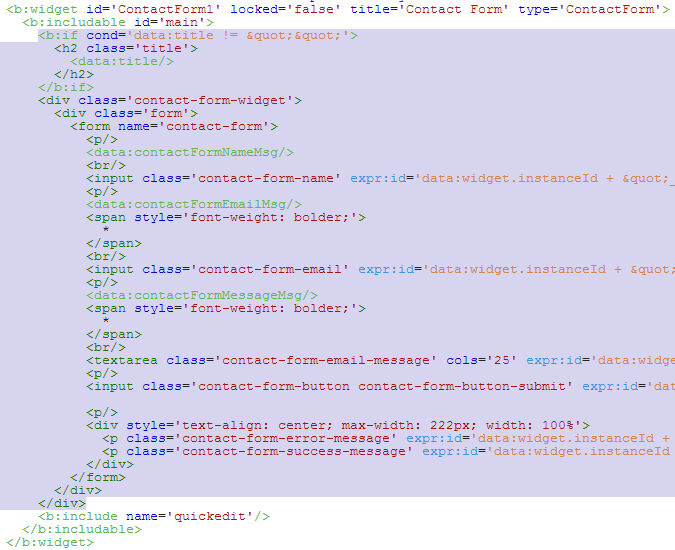
so that it ends up like
 Now
we have prevented the Contact Form Widget from appearing anywhere on
the sidebar but have kept the widget registered.Make sure that you don't remove the widget from the Layout Page.
Now
we have prevented the Contact Form Widget from appearing anywhere on
the sidebar but have kept the widget registered.Make sure that you don't remove the widget from the Layout Page.
- Save the Template and it’s done.You now have a separate contact page on your Blogger blog :-)

<form name='contact-form'>
<div>Your Name : </div>
<input class='contact-form-name' id='ContactForm1_contact-form-name' name='name' size='30' type='text' value=''/>
<div>Your Email: <em>(required)</em></div>
<input class='contact-form-email' id='ContactForm1_contact-form-email' name='email' size='30' type='text' value=''/>
<div>Your Message: <em>(required)</em></div>
<textarea class='contact-form-email-message' id='ContactForm1_contact-form-email-message' name='email-message' rows='5'></textarea>
<p></p>
<input class='contact-form-button contact-form-button-submit' id='ContactForm1_contact-form-submit' type='button' value='Send'/>
<div style='text-align: center; max-width: 450px; width: 100%'>
<p class='contact-form-error-message' id='ContactForm1_contact-form-error-message'></p>
<p class='contact-form-success-message' id='ContactForm1_contact-form-success-message'></p>
</div>
</form>
While creating the Page, you have to switch to the HTML mode as shown in the image below. Then paste the above code into the post editor, disable the comments and publish your page.


 Now
we have prevented the Contact Form Widget from appearing anywhere on
the sidebar but have kept the widget registered.Make sure that you don't remove the widget from the Layout Page.
Now
we have prevented the Contact Form Widget from appearing anywhere on
the sidebar but have kept the widget registered.Make sure that you don't remove the widget from the Layout Page.Happy Blogging!
FIND INSTALLATION DATE OF YOUR WINDOWS
you can find the date of
installation by opening cmd and typing this command
CODE
cmd /k systeminfo | find
"Original Install Date"

RESTART YOUR WINDOWS PC FASTER
Nowadays we have only one button on our PCs and Laptops for
starting or shutting down the PC. But on earlier Windows machines we used to
have two buttons, one for the Shut Down and the other for Restart.
HOW TO CREATE NEW PARTITION IN WINDOWS
If you want to create new Partition
in windows 7 without format hard drive , then you can do it by the help of Disk
management .
Follow these steps to Create new partition in Windows 7
1. Right Click On My Computer, Then Click On Manage.
Follow these steps to Create new partition in Windows 7
1. Right Click On My Computer, Then Click On Manage.

Sunday, September 15, 2013
How To Play or Pause A Song Just By Raising Your Hand

How To Play/Pause a Song Just By Raising Hand :
Flutter is an application for both Mac & Windows that allows you to control your Windows music player, winamp, itunes or spotify through hand movement. This technique is totally depend upo webcam , so if you don't have webcam then just ignore this post.
Requirements To Use Flutter :
A PC or Laptop with Mac or Windows installed.
A Webcam, external for desktop or internal webcam of laptop will also do.
A supported media player from Windows Media Player, itunes,vlc , spotify, b or winamp.
How to Use Flutter :
Run the application and play any audio or video through above given media players to experimenting this trick .
Now make sure your webcam is working properly, now finally RAISE YOUR HAND and see the magic of play/pause.
Don't forget to give your feedback :)

Installing Joomla on localhost
in this article i will tell you that how you can install joomla cms on your localhost
things you required
1- Apache server (xampp or wampp)
2- Joomla Cms (download from official website)

okay...
lets get started..install xampp in your computer
now you can see
C:\xampp folder in your C driver
paste your joomlacms that is zipped when downloaded...and extract it in
C:\xampp\htdocs folder
oka..after extracting rename the joomlazipped extracted folder to joomla or whatever that you can remembers
oka now open your browser
and type localhost or 127.0.0.1
you can see xampp default page there..
goto phpmyadmin by
localhost/phpmyadmin
when its open...create database name as 'joomla'
and save it
now open localhost/joomla (note: joomla is the name of folder that you copied in xampp/htdocs/)
you will see installation wizard
follow the wizard and press next
when it ask for database name .. type joomla (that we created in phpmyadmin)
username = root
and leave password field empty
now press next ,... it will ask for site basic info , like site name , admin password etc, type whatever you want...and then finaly its done.... now it requried you to delete
xampp/htdocs/joomla/installation directory..
when you delete installation .. you can view your new joomla cms as
localhost/joomla
and for admin panel.. type
localhost/joomla/administrator
and give admin username/password and then you can confgure site for you :)
thats all.. here is the video demonstration
things you required
1- Apache server (xampp or wampp)
2- Joomla Cms (download from official website)
okay...
lets get started..install xampp in your computer
now you can see
C:\xampp folder in your C driver
paste your joomlacms that is zipped when downloaded...and extract it in
C:\xampp\htdocs folder
oka..after extracting rename the joomlazipped extracted folder to joomla or whatever that you can remembers
oka now open your browser
and type localhost or 127.0.0.1
you can see xampp default page there..
goto phpmyadmin by
localhost/phpmyadmin
when its open...create database name as 'joomla'
and save it
now open localhost/joomla (note: joomla is the name of folder that you copied in xampp/htdocs/)
you will see installation wizard
follow the wizard and press next
when it ask for database name .. type joomla (that we created in phpmyadmin)
username = root
and leave password field empty
now press next ,... it will ask for site basic info , like site name , admin password etc, type whatever you want...and then finaly its done.... now it requried you to delete
xampp/htdocs/joomla/installation directory..
when you delete installation .. you can view your new joomla cms as
localhost/joomla
and for admin panel.. type
localhost/joomla/administrator
and give admin username/password and then you can confgure site for you :)
thats all.. here is the video demonstration
Thursday, September 12, 2013
Super Copier

Windows doesn't certainly stand out for its speed when copying or moving files. This is why using a program like SuperCopier is such a great idea!
SuperCopier manages transfers of large
quantities of folders and files, or huge-sized files in a much more reliable
and efficient way than that standard Windows Explorer. You can run the program
from its icon on the system or simply copy and paste files and folders in the
usual way: SuperCopier is embedded in Windows Explorer and will take care of
the task.
This program not only makes copying and moving
files much faster, but also adds some handy new options: you can now pause and
resume the task at any point, see the transfer speed rate, check the percentage
of completion, create lists of files to be copied or moved and even modify this
list while the process is already taking place. Best of all, SuperCopier
doesn't replace the standard copy/paste Windows functionality, so you can try
it out without any fears and simply uninstall it in case you're not happy with
it.
SuperCopier includes a complete settings menu
that lets you tweak the program's behavior, as well as customize some details
in the program's interface– which, to be honest, wouldn't win any design prize.
SuperCopier enables you to copy and paste
files and folders in Windows in a much faster, more reliable and efficient way.
download it here:

download it here:
Friday, August 23, 2013
UBUNTU SKIN PACK FOR WINDOW 7

Ipatie computer yako muonekano wa Ubuntu ilhali unatumia window 7
skin pack hii ni rahisi ku install na kutumia pia, kumbuka ku uninstall old version zote za skin pack ulizonazo kabla ya ku install hii skin pack. baada ya ku install restart computer yako.
kwa msaada cheki nasi hapa
window 7 X86

window 7 X64
Technology in Sports
The world of sport is continually changing over the years, and the use
of technology is just one of those areas that has made an impact on many
sports in the modern day. One criticism of the use of technology is
that it can slow down the speed of the game, but on the other hand for
many people it makes watching it more enjoyable to see the correct
decisions being made.
Kenya: Tax impacting mobile penetration
 It has been reported that a section of Kenya’s Information and
Communication Technology (ICT) sector has contested mobile penetration
figures released by the country’s telecommunications regulator, the CCK (Communications
Commission of Kenya). At the same time some operators have
criticised the resumption of the 16% tax charge on mobile devices.
It has been reported that a section of Kenya’s Information and
Communication Technology (ICT) sector has contested mobile penetration
figures released by the country’s telecommunications regulator, the CCK (Communications
Commission of Kenya). At the same time some operators have
criticised the resumption of the 16% tax charge on mobile devices.CEO Steve Ballmer to quit Microsoft
Microsoft announced that long-serving Chief Executive Officer Steve
Ballmer will be leaving the employment of the technology giant. While no
exact date for his retirement has been given, the company stated that
he will be leaving within the next 12 months

Wednesday, August 21, 2013
Cybercriminals developing more malware

Tuesday, August 20, 2013
Change Logon Screen For Windows 7
Changing Windows 7 logon screen (Welcome screen) kwa kawaida si kazi ndogo. sasa ili kuifanya rahisi complex system leo hii tunakuletea software inayoitwa “Windows 7 Logon Background Changer” ambayo inakurahisishia kazi yoote hii. Application hii ni open source ambayo inakupa uwezo wa kuchagua folder ambalo ungependa kuweka background yako. inaonesha muonekano ule ule ambao utakuwa umeuchagua na ku apply kwa
background.

enjoy.

enjoy.
Subscribe to:
Posts
(Atom)
Popular Posts
-
There are two common keyboard issues that can occur during the normal operation. The first is the Num Lock key gets accidentally pressed,...
-
A computer is a complex electronic device which we own proudly. But to remain its proud owner we need to take care of it. To ex...
-
 Before we go straight on how to make bootable USB/Flash drive, We want to share some of reasons why we need a bootable USB/Flash driv...
 -
Do you know, your Facebook account have 3 passwords? If no, then read on…..
-
USB flash drive is useful because it provides a convenient way for you to bring your data around. However, due to its convenience, it is...
-
Make your computer ask for a password without installing anything. Your computers BIOS is the first program that is run when your compute...
-
To change your active partition back using the Windows 7 recovery disc or Installation DVD, follow the steps below. Step one: Follow step...
-
When you are running Windows 8 modern apps, you will find that the Windows 8 apps have no access to files on external drives. It ...
-
In most situations, we want to have as little apps running during startup as possible, so the whole boot up process will be quick and fast....
-
 in this article i will tell you that how you can install joomla cms on your localhost things you required 1- Apache server (xampp or wampp...


